I own three Seequa Chameleon-line units. If a sentence can describe a person, I am now a lunatic in your eyes. My three units are as follows:
- Chameleon: SN# 04112. Rough case, no feet, has original drive faceplate cut off of drive and hot glued shut, two half height drives installed.
- Chameleon Plus: SN# 04747. In a decent case, feet around bottom screws are deteriorating and missing a screw on the back plate. Has two half height drives installed
- Chameleon: SN# 08003. In the best looking case. Not working. Has original Tandon drives. FedEx dropped this one, and destroyed the CRT and knocked several chips off the logic board.
The Chameleon Plus (SN# 04747)
SN# 04747 is first on my refurbish rampage. The symptoms this machine was having were:
- Spotty power on sequence. Sometimes, the BIOS screen would appear. Other times, only a flashing square.
- Drive A doesn’t seem to read.
- Drive B tore a disk’s center ring.
- The keyboard does not work.
This unit has an 8087 Math Coprocessor, two half height drives, an NEC V20 replacement for the 8088, and a nice cover for the empty slot left behind. Taking the machine out of its case reveals the guts. The first thing I noticed that is different between this one’s logic board and #04112 (what I believe to be a regular Chameleon) were two large flat cables on J12 and J13. Tracing these down into the chassis revealed they are attached to a daughter board mounted to the bottom of the machine.
Almost every important chip on the board is socketed, including all RAM and the CPUs. I deOXITed the CPUs, and the chips labelled “CRT”, “NMI”, “KBD”, “ROM”, “DRAM”, “POST”, and other larger chips. I needed to deep clean the board before even thinking about touching the RAM chips. When powering back on the machine, the BIOS screen displayed again! However, only one of my three Chameleon keyboards seems to work.
The Plus labeled keyboard and the working keyboard both light up for a split second, but the Plus keyboard doesn’t actually light up after the fact, where the working one does, but I will focus on this later. The next thing on my list now that we have a reliable BIOS POST is to boot to an OS.
Since both disk drives are a) filthy and b) not working, I do not want to put any of my disks in either of them. Especially since drive B ate one of my disks already. My solution for temporary testing is a Gotek floppy emulator running FlashFloppy, an open source firmware mod for Gotek emulators. Configuration of the Gotek drive matches any IBM Compatible, with jumpers S0, S2, and MO open, and S1 strapped. FF.CFG needs to have the interface specified as IBMPC.
Getting to the floppy cable was going to be the hard part. The floppy drives are enclosed in this huge metal shroud that juts up to the back of the case for the most part. I undid the screws on the top of the shroud thinking those were the only screws holding the original drives in place. I was wrong. I would have to flip the unit upside down and unscrew the bottoms of the drives as well. This is where I should point out that without the logic board mounted to the top of the whole chassis, the whole unit bends and wobbles weirdly. I was able to flip it onto its side, with the CRT on the bottom. The expansion board I was talking about previously was mounted directly beneath the floppy drive screws. Four screws removed the expansion board. We’ll get to that board in a second. The plate that held the board (which is now being held up by pure luck and the cables attached to it) also housed the last screws to remove the floppy drives. However, the thing I did not think of was how much those drives weigh, and they are directly over top of the CRT at this point. I had to wedge my hand between the drive shroud and the CRT’s flyback, probably leaving a centimeter or two between certain death and supporting very sharp metal. undoing those screws and trying to bend the metal and move cables around behind the shroud, all while suspending its full weight above a nice 30kV death was probably the most terrifying thing I have ever had to do, but I was able to free the drives.
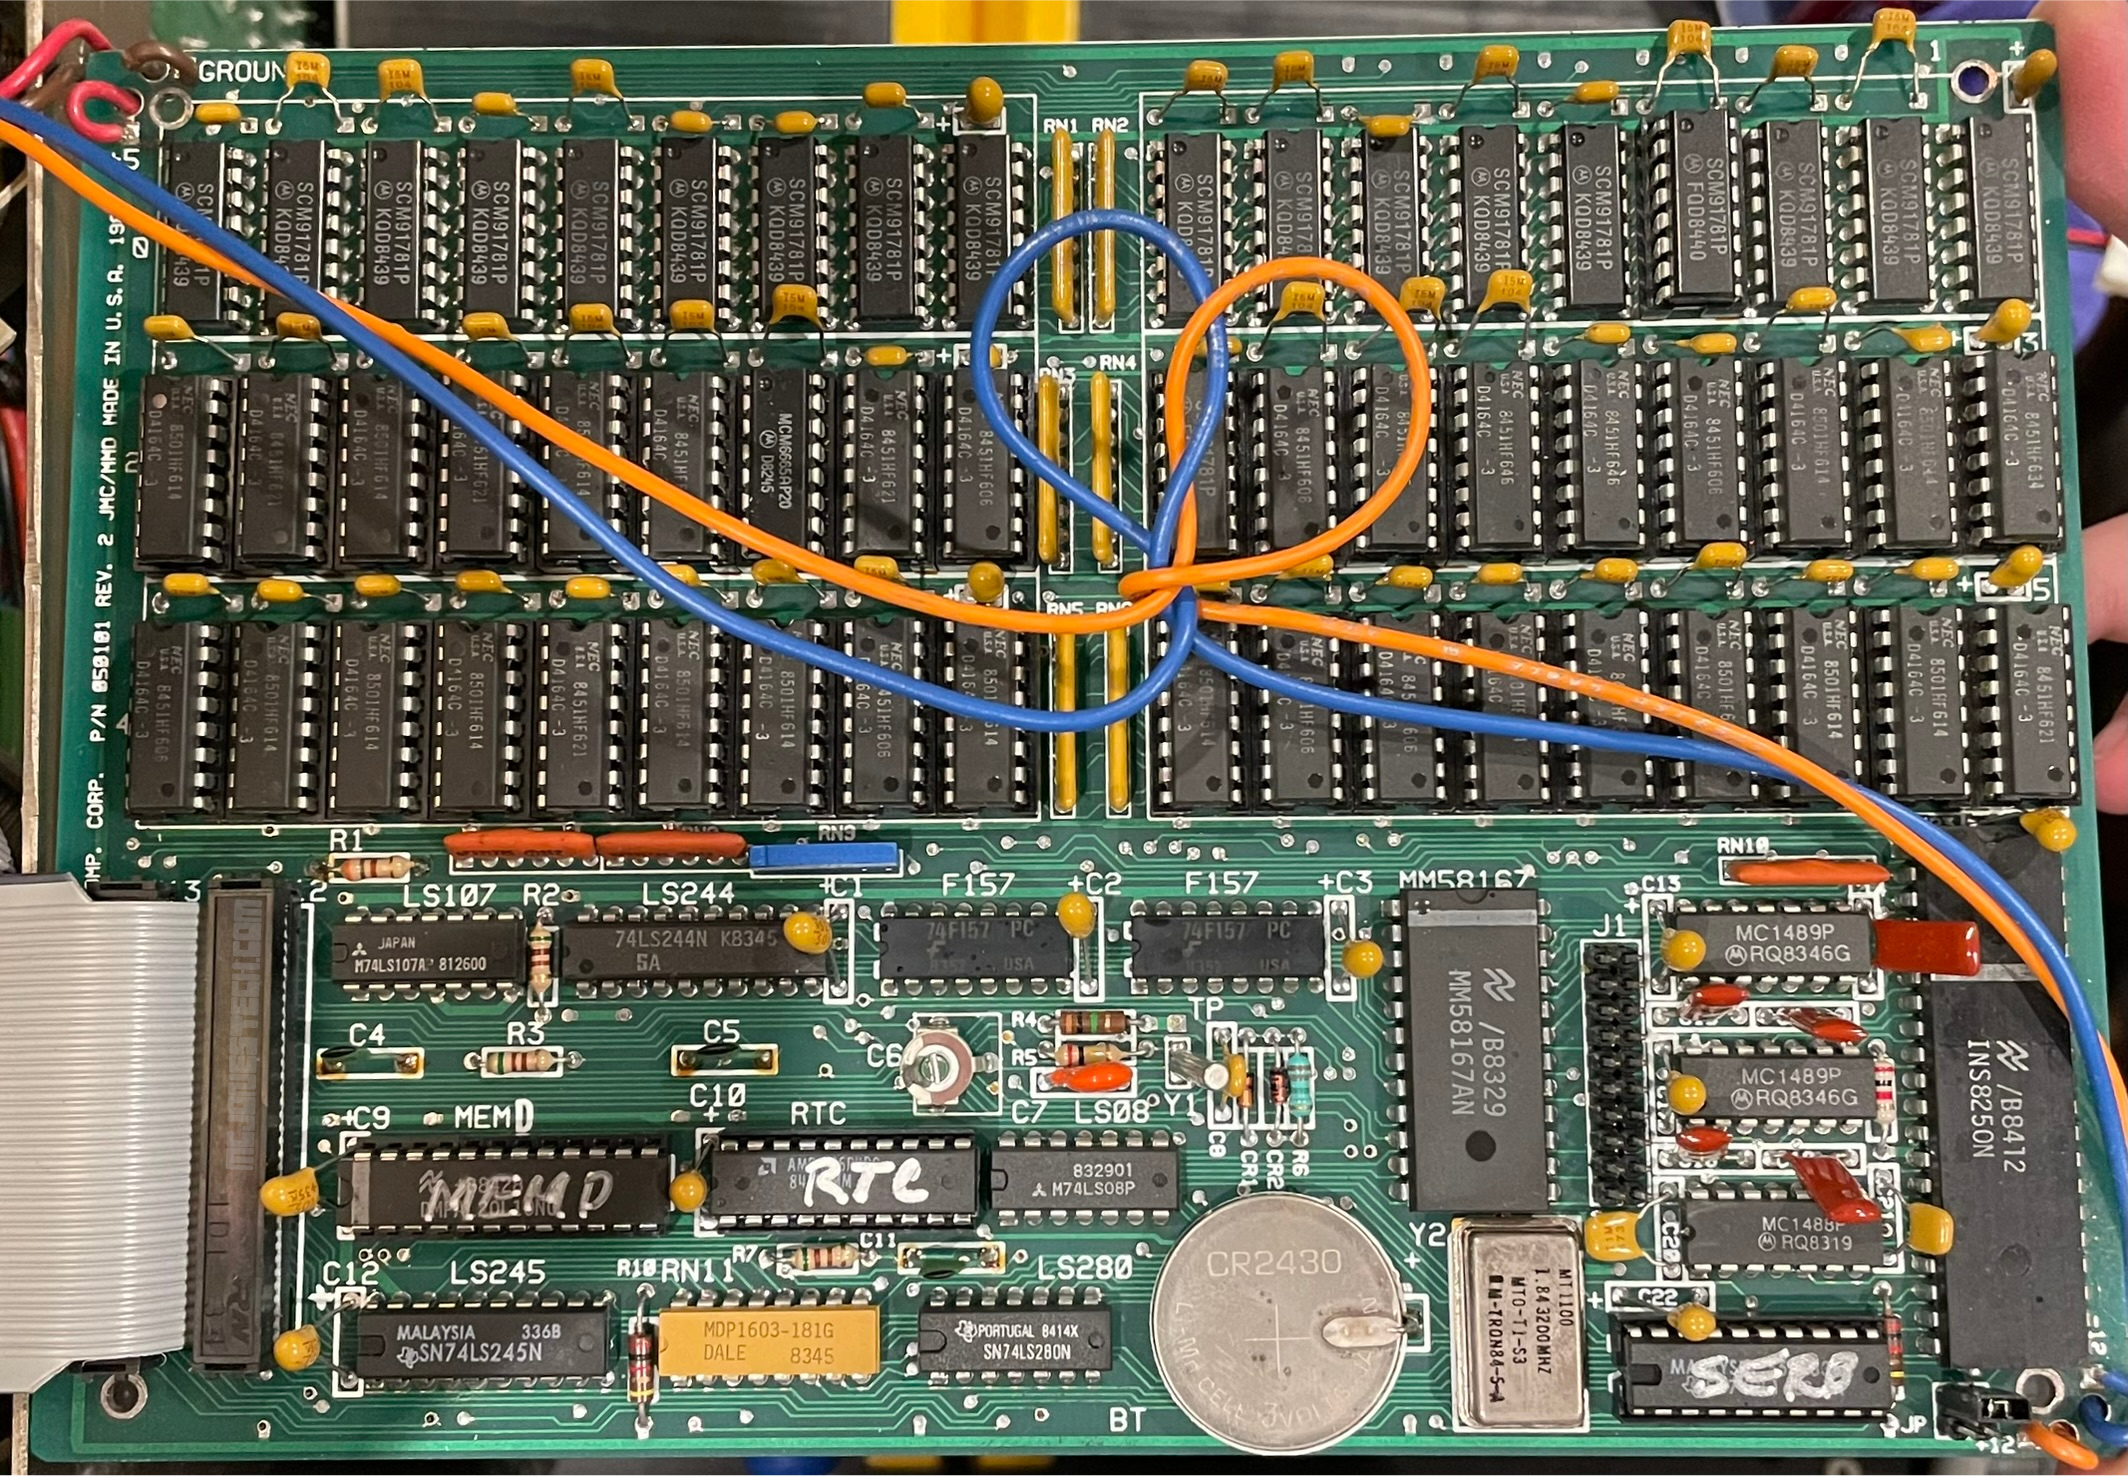
Now that I almost certainly punched my time clock early, let’s focus on this expansion board. On the bottom of the plate that the board was mounted to is written “640K W/ IBM SER”. Now wait a second, I thought internal upgrades on the Chameleons were not offered? Well, the board is stamped “SEEQUA COMP. CORP.”, so it is an official expansion board. The serial port on the back of the unit was attached to this board at J1, probably the “IBM SER” mentioned on the plate. An obvious amount of RAM chips also reside on this board. There is a CR2430 coin battery, along with a chip labelled “RTC”, meaning that the Plus has a real time clock. I will need to desolder and replace this later. I later found out from my Chameleon Plus Manual that this card is called a Seequa RAMPlus card. Neat! I am however missing the software disk it would have come with.
With the removal of the floppy drives, I could now access the floppy cable. Hooking it up to my Gotek was no problem, and I ensured to have the Seequa OEM CP/M-80 and MS-DOS 2.00 loaded and ready. Turning on the Plus revealed that the flashing green square of death was back… Until it wasn’t. It loaded to CP/M after about 5 seconds of flashing. I progressed the Gotek image by 1, and reset the machine. Again, flashing green screen, then DOS. Using the working keyboard, I found keys such as “L”, “Enter”, and other important keys were not working at all. I swapped out the ‘working” Seequa keyboard for a standard DIN connector keyboard, and everything was working as expected. I almost wonder if the keyboards have chips that need deOXITing…
After playing around with a very horribly stripped down version of DOS that is the Seequa OEM version, I decided I wanted to try to add some other commands to it, and possibly make a disk image of some demos and such I wanted to play with. However, HxC claims the disk is unbrowsable. Annoyed, I took the USB drive back to the Plus, and powered it back on. As if cursed by some sort of demon, the flashing green screen issue was back in full force. However, detaching the expansion card from the machine altogether resolved that issue in full. That obviously annoyed me a bit, and so I needed to figure out a way to have a RAM test or something be able to run so that I could rule if the green screen issue was a RAM problem or not. So far, I have not had the slightest bit of luck getting another floppy disk image to work AT ALL.
I posted a plea for software information and OS information to VOGONS and the Vintage Computer Federation forums, but never heard back from anyone. I am honestly not surprised. However, the WinWorld forums pointed me in the right direction. Someone pointed out that the “MS-DOS” dump on their site that is supposedly the Seequa OEM diskette was actually IBM PC-DOS, and that the Seequa OEM disk has never been dumped. That meant that I had successfully booted to PC-DOS on this machine before, and more than likely could do it again. I downloaded IBM PC-DOS version 2.10, and tried to boot the image one more time. To my honest surprise, it worked. I was navigating around a much fuller DOS installation and could run a “VER” and “CHKDSK” command to see versioning and RAM amount: 640K. Using the original PC-DOS disk as a basis using Digitoxin’s DiskImageTool, I copied KI3V’s XTRAMTEST to a disk. Running it on the Plus showed that all 640K of RAM passed.
My next task was getting software to run. I tested the big software that the Chameleon could supposedly run, Flight Simulator, and it was unable to even read the disk. A test I like using on DOS-based machines is Hudson Green’s STILLALI.exe, a faithful port of “Still Alive” and the end credits from Portal to the IBM 5150. After creating a disk with that executable on it, I slapped it on the Gotek and booted up PC-DOS again. To my utter shock, the Plus started up the program with absolutely no problem. So, behold, the first publicly available video of a Seequa Chameleon Plus running software.
Moving towards the floppy drives, the two upgraded ones in the Plus were identified to be two Toshiba drives mounted together. The model number stamped on the sides are “FDD 5401 EOK 01”, with serial numbers of “A5414759” and “A5414767”. Both are revision C apparently. According to my own stare-and-compare and SN #08003’s original disk drives, the Chameleon came with either one or two Tandon SS/DD drives, and the Plus came with two MPI SI51 drives.
The keyboard is a Keytronic, which means I figured out why the keyboards are not working great: Foam and Foil. If you know anything about foam and foil keyboards, you will know that this 1983 keyboard probably put enough disintegrating foam in my lungs to kill a Victorian child. Once all the remains of the original pads were removed, I replaced them with brand new pads from Tex Elec.
The power situation with this machine is something I cannot for the life of me figure out. There are two power supplies, both Boschert models. One is mounted directly behind the CRT, which is model XL50-3601R. The bottom power supply is mounted directly underneath the rear of the CRT, which is model XL53-3601R. I reached out to Console5, and was able to get capacitor replacement kits for both of these units. Since working on the Osborne 1, I will not risk anything when I see those stupid RIFA filter caps hanging out, and each one of these had 3-4 of them.
The Chameleon (SN# 04112)
This machine is an absolute mess. Just from looking at it outside of its metal chassis, we have a list of several problems:
- One of the disk drives isn’t even mounted in
- The floppy drive cable is backwards
- The entire board is warped downwards on the front
- Someone haphazardly drilled holes in the bottom and top of the drive chassis to mount one of the drives
- The fan is LOUD. Like, the equivalent of a small jet engine running in the back of this unit
Despite all of this, I decided to try to boot up PC-DOS and run the RAM test and Portal Demo. The RAM test seemed to fail after checking the first pass of the 128K of RAM, and the Portal demo displayed an error message of “Non-masked Interrupt”. Huh.
Removing the logic board shows that there is a different CRT inside this unit. The picture seems to fit the screen better on this one, and doesn’t seem to have the same left hand alignment as the Plus screen has. However, the screen looks a little fuzzy. A full disassembly shows that this unit has two entirely different power supplies in it, unlike the Chameleon Plus.